Elasticsearch: introduction, implementation and example
The most challenging task in web development is to find a suitable and efficient searching algorithm or tool. To provide the best user experience, the user should be given a wide variety of search options with optimal searching speed.
Elasticsearch covers all those cases and with few extra features to make it even better.
All code that has been used while making this tutorial can be found on our GitHub profile, you can download it and try it for yourself for this example.
And if you’re looking for a partner to help build your digital business – look no further. We’re experts in building data management and automation solutions and we have dozens of dedicated development and design professionals on our team. Give us a call! 🙂
What is Elasticsearch and how it works
Elasticsearch described on their site:
Elasticsearch is a distributed, RESTful search and analytics engine capable of solving a growing number of use cases. As the heart of the Elastic Stack, it centrally stores your data so you can discover the expected and uncover the unexpected.
Elasticsearch uses a document-oriented approach when manipulating data which is stored in JSON format. Data can be organized and stored based on the index and type. There can be multiple indexes and types. You can think of the index as a database in regular relational database and type as tables. Below is a simple comparison between the relational database and Elasticsearch.
- MySQL > Databases > Tables > Columns/Rows
- Elasticsearch > Indices > Types > Documents with properties
What are the ways of implementing Elasticsearch
When it comes to implementation, there can be several ways of implementing.
- Run it in on localhost on your instance where your project/website is.
- Services that run only Elasticsearch separately from your instance, for example on Amazon using AWS Elasticsearch.
You can choose the instance size and plan for your needs as you wish. Later we will see how does Elasticsearch behave on localhost, how much memory does it take and how much usage of your processor does it take.
Setting up Laravel application
In this blog post, we will cover ways of implementing Elasticsearch and how it performs in different situations and environments.
For our case, everything will be running on Ubuntu OS. in time of writing it was used latest PHP version 7.2.9 and for the database we used MySQL.
First, we will start by creating our Laravel app. You can do so by using composer or via Laravel installer
composer create-project –prefer-dist laravel/laravel movie-management “5.6.*”
When the installation is done, we can set up our environment such as the database, virtual host, environment data and git if preferred. Afterward, we continue with creating and filling up our database with data. In this example, we will be building a simple app for managing movies and actors.
For the sake of simplicity, we created two tables, “movies” to contain basic information about movie and “movie_actors” for a list of actors in the single movie. Now when migrations are over, we’ll create models and movie resource controller.
When creating resource controller with artisan command you can add “-r” parameter so that command knows what use will it be and will generate basic CRUD methods for you
php artisan make:controller MovieController -r
Now we can create our view for listing all movies from the database and simple form for creating new movies. We will use Bootstrap to make things nice and clean.
Once that is done, we can fill our database with some data so that later on we have enough data make it searchable.
Steps for installing Elasticsearch on Linux/Ubuntu
Now we will put aside the website and continue with the installation of Elasticsearch on our machine.
You can find download links on their official page
Since we are installing Elasticsearch on Ubuntu (version 18.04.1) you can follow these steps.
Elasticsearch requires minimum Java 8 or newer to operate
sudo apt-get install openjdk-8-jdk
java -version
Then we proceed to installing Elasticsearch
wget -qO – https://artifacts.elastic.co/GPG-KEY-elasticsearch | sudo apt-key add –
sudo apt-get install apt-transport-https
echo “deb https://artifacts.elastic.co/packages/5.x/apt stable main” | sudo tee -a /etc/apt/sources.list.d/elastic-5.x.list
sudo apt-get update && sudo apt-get install elasticsearch
After all of those commands are executed, and download with installation is complete, we can run it. To do that we will run it as service using these commands
sudo systemctl enable elasticsearch.service
sudo systemctl start elasticsearch.service
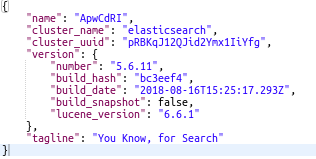
If everything is configured right, the service should be up and running, and we can test that with a tool called Postman which is used for sending customized requests. All we have to do is to send a GET request to this URL:
http://localhost:9200
Port 9200 is the default port that Elasticsearch operates on. After hitting “Send” you should receive JSON response that looks something like this:
How to implement Elasticsearch in Laravel
Now when Elasticsearch service is up and running, we can hook it up with our Laravel application. To do that we need a few packages.
First is the official Elasticsearch client that enables us to communicate with Elasticsearch service. To install it you have to add it to your composer.json require section.
“require”: {
“elasticsearch/elasticsearch”: “~6.0”
}
Then run
composer install
to install it.
After that, for easier usage with Laravel, we will add one more package which is Laravel Elasticsearch. One of the things that this package does is, it extracts all connections strings to “.env” file. To download it we’ll use composer command:
composer require cviebrock/laravel-elasticsearch
Once it’s downloaded, we need to publish it so that all configuration files can be created. To publish it run this command
php artisan vendor:publish –provider=”Cviebrock\LaravelElasticsearch\ServiceProvider”
When it’s published, we can add required data in “.env” file for Laravel to communicate with Elasticsearch.
ELASTICSEARCH_HOST=localhost
ELASTICSEARCH_PORT=9200
ELASTICSEARCH_SCHEME=http
ELASTICSEARCH_USER=
ELASTICSEARCH_PASS=
Once all things mentioned above are complete, we have successfully installed Elasticsearch service and driver for communicating with Laravel app.
Now it’s time to use Elasticsearch services. As we mentioned before, the data has to be indexed which means we need to import it to use it.
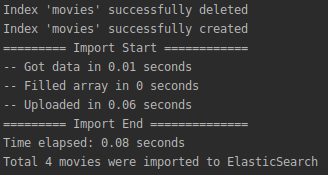
To do that we will create an artisan command which will automatically generate index and import all data from our database to Elasticsearch service.
In this command, first, we check whether the index with the same name already exists, if it does then we delete it and make a new one. After that, we get all data from the database and fill it in an array which will later be applied for bulk indexing.
In this scenario, we add timers on each action to see how much time does it take to perform specific steps, which will later be used in statistics.
To avoid accidentally importing data to wrong index or type, we’re adding names of indexes and types to “Movie” model as constant, so that if we ever have to change it, it will be on one place.
Once we are at indexing, we can add an event to be triggered when a new movie is added, so that data in database and data in Elasticsearch are always synchronized.
To do that, add an event which will be fired after the new movie has been added and listener for that event to import that movie data to Elasticsearch.
When we were importing data with the command, we did bulk indexing where we added multiple movies at once. Now in the listener only thing that is changed, we’re adding a single movie, and that is done by calling different command.
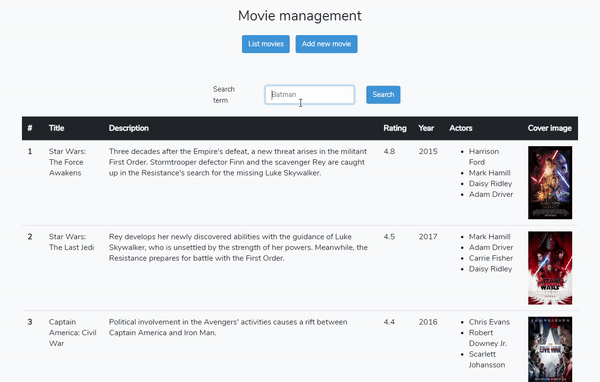
Now let’s get to the fun part, which is searching for data. Firstly, let’s modify our index page for movies and add search term input.
When we’re searching through Elasticsearch, in response we will use only id’s of movies that are matching search term so that Laravel’s Eloquent can make relationships with other necessary data.
In the above code example, we’re searching for given text in three fields, that is in title, description, and actors. In the search query, we also added fuzziness which will find our result even if we mistype our search text. Fuzziness is declared by the integer of edit character places (Levenshtein Edit Distance).
As you can see, Elasticsearch finds all results that contain given search text, of course, that can be regulated with “score” which is a calculated number of found occurrence in search results. Higher score the result is more relative to search text.
All code that has been used while making this tutorial can be found on our GitHub profile, you can download it and try it for yourself for this example.
Elasticsearch performance in comparison to other technologies
To test its performance we’re using different project, but with the same implementation, the only thing that is different is that now in the database we stored users with some necessary information like name, phone number, address …
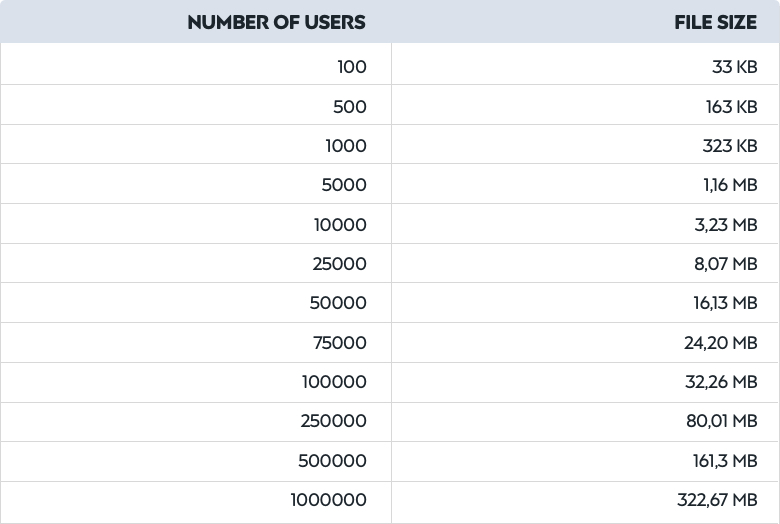
With Faker library (Link) that auto-generates all these properties, we generated sets of 100, 500, 1k, 5k, 10k, 25k, 50k and 75k users which we’ll see how it performs in different actions.
Firstly, we generated those users in separate JSON files, so, later on, we can import them. Below is a table with file sizes for specific user set.
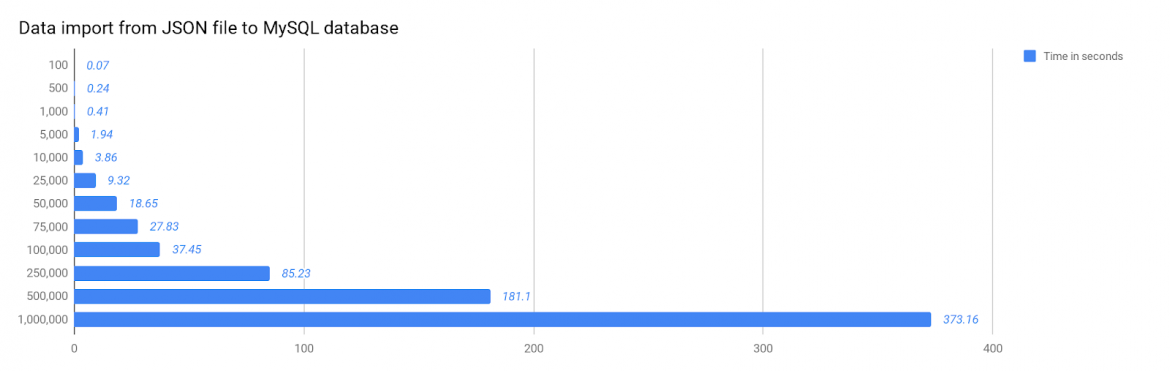
Now, we are starting to import each set and check elapsed time. First comes import to localhost database.
Next comes import from JSON file directly into Elasticsearch service that is running on localhost.
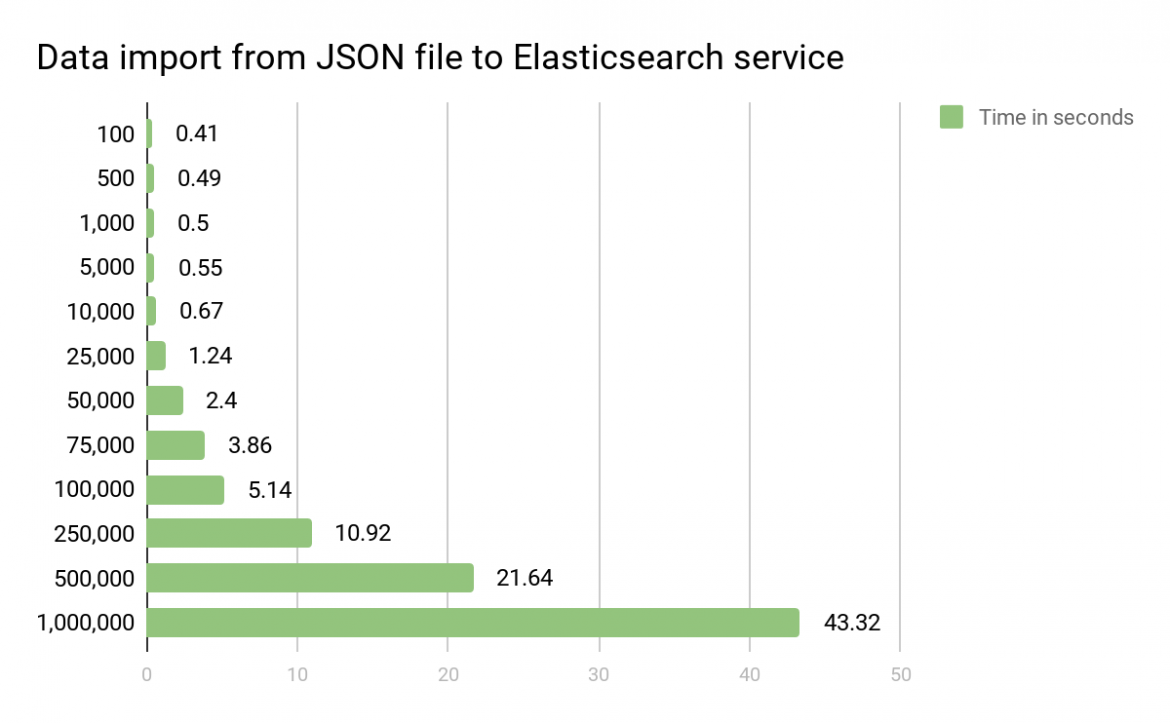
Note on the top chart is that set from 25k and higher are divided into chunks size of 17k and the rest that is left to the complete the transfer.

On the top bar chart, we can see the comparison between importing data to Mysql and Elasticsearch. Of course, this depends on each machine, but just for comparison, this was done on a local machine with medium grade hardware.
Now let’s test the searching speed and the results. For a start, we’ll search for a single name taken randomly from the database. We’ll do that on all users sets using Elasticsearch and Laravels Eloquent.
In Elasticsearch we’ll add fuzziness to retrieve more data even if we mistyped some words. On the other side on Eloquent we use LIKE query. On both sides, we use the same search parameters and properties.
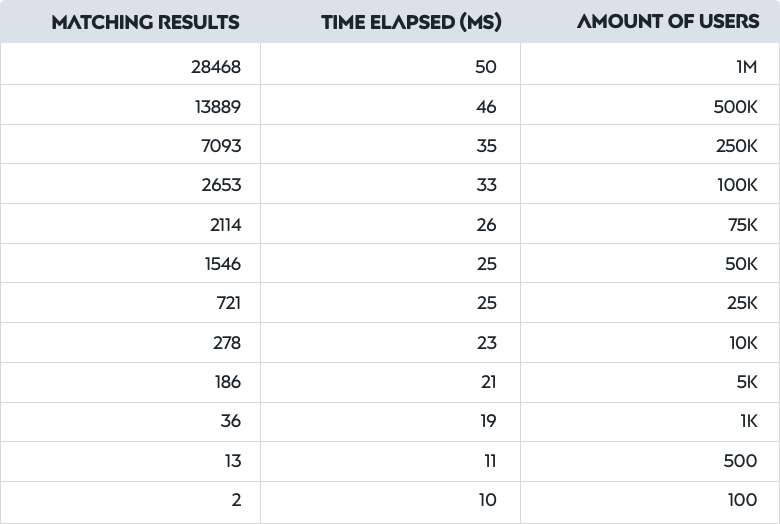
First, we test Elasticsearch. In the table above we can see that Elasticsearch has no problem with searching through big data and it’s included fuzziness retrieves more similar data with no significant impact on elapsed time.
Now let’s continue search in Laravels Eloquent.
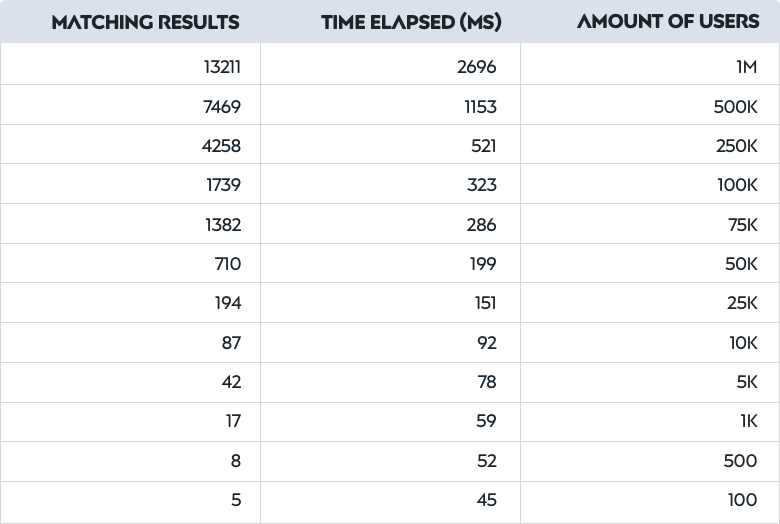
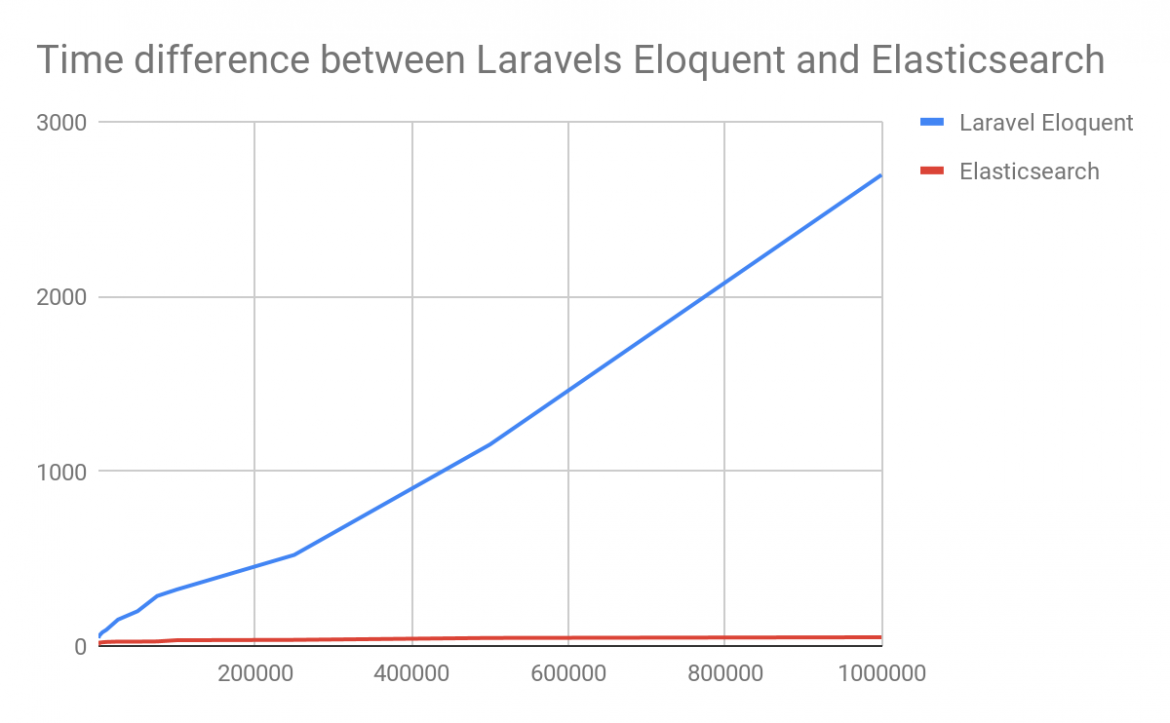
With search done we can see that there is a somewhat significant difference between Laravels Eloquent and Elasticsearch. Keep in mind that search above is a really simple query to search through 3 properties.
Every other query added on search will increase exponentially on Laravel’s eloquent where on Elasticsearch is in the margin of 20%-30%. Now to better see time comparison between Elasticsearch and Eloquent, you can check it on the chart below.
When and should you use Elasticsearch?
After all these steps on how to implement Elasticsearch and from testing its performance, comes the question is Elasticsearch worth implementing and how it may affect your existing project structure.
As we can see from the performance charts, Elasticsearch shines the best at handling big data where on the lower quantity of data it’s equal to (in this example) Laravel’s Eloquent.
Next comes the Elasticsearch as service, it needs space, depending on the size of your data, handling big data will cause higher usage of memory and CPU power.
Of course, this can be solved by getting services that host Elasticsearch on a separate instance, for example, AWS Elasticsearch service where you can choose plans for your needs.
Now on the usage itself, Elasticsearch out of the box has to offer many features when it comes to searching and manipulating data like Fuzzy search, full-text search, suggestions, result highlighting and many more.
Some features require writing complex queries for searching and sometimes mapping if you want a specific type of response. In the end, we think it’s worth implementing especially if you have high amounts of data and need to access/find particular data quickly then Elasticsearch is there for you.